Typical John. Take on something that you think you can handle, get the materials for it, then watch as reality slaps you around like the idiot that you are. This is going to be no different. You want to make a jewelry box? Cute. With a band saw that you don't have? C'mon. And out of a wood that is not recommended (in fact, one of the only 2 woods not recommended)? Get real. In 3 weeks? HAHAHAHAHAHAHAHA.
Three weeks before my wife's birthday, I had this really cool idea that had stemmed from a conversation with a woodshop teacher in my school district:
I should build her a jewelry box.
Things have been interesting this year, but one constant has been my wife's unwavering support and love. Even with the times I've been gone for La Cucina Matematica with Matt Vaudrey, she's been 100% supportive. I'm not the "go out and buy you 3 dozen roses just for the hell of it" kind of guy, but I do love making things to show my appreciation. What better way to show my appreciation for her being my rock than building something that she can enjoy?
Funny thing is, I learned a lot more in those three weeks than just how to build a jewelry box.
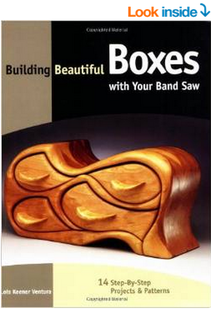
It started with a naive sense of confidence that I could do it and, even without the band saw portion of the band saw jewely box, I used this book and went with the design on the cover:
Three weeks before my wife's birthday, I had this really cool idea that had stemmed from a conversation with a woodshop teacher in my school district:
I should build her a jewelry box.
Things have been interesting this year, but one constant has been my wife's unwavering support and love. Even with the times I've been gone for La Cucina Matematica with Matt Vaudrey, she's been 100% supportive. I'm not the "go out and buy you 3 dozen roses just for the hell of it" kind of guy, but I do love making things to show my appreciation. What better way to show my appreciation for her being my rock than building something that she can enjoy?
Funny thing is, I learned a lot more in those three weeks than just how to build a jewelry box.
It started with a naive sense of confidence that I could do it and, even without the band saw portion of the band saw jewely box, I used this book and went with the design on the cover:
Lesson 1: More Social, Less Social Media
One of the best decisions I made in my 2014 blog reading was to subscribe to Megan Schmidt's blog. Although I'm not vegan and don't have an affinity for beagles (or dogs, for that matter. Sorry, Megan), her posts resonate with me in so many ways. I had the chance to meet her at Twitter Math Camp last year and I'm so fortunate for that. Anyways, her most recent post does more than resonate - it hits home hard. Maybe one day I'll be strong enough to share my depths like she has, but not today.
Something that I've struggled with for years is the addiction to, among other things, validation. I need it. It sounds egotistical to say, but it's the truth. Being a high school student-athlete wasn't enough because there were people better than me. I thought friends were my friends because they felt bad. Even now, I've had friendships with people for several years and question if they really like me or they just put up with me. It's stupid, but true.
The reason that I bring this up is because Twitter perpetuates this feeling. I go on at times to seek validation. I jump into conversations because I want to know that my thoughts are worthwhile, that what I have to offer is valued and valuable, and that I am to others what I think I am to myself. It's stupid, but true.
Because of this, I get caught spending time away from what matters most (family) to seek this validation (Twitter). Sure, I love the conversations and it's 100% genuine from my end of the keyboard, but I give up face time with the ones I love to seek approval from many I've never met.
No. Enough. For this project, I needed to put down social media and focus on the social aspect of woodworking. I didn't google anything. Nothing got looked up on YouTube. Instead, I did what men and women used to do to get the answers to their questions - I asked the experts.
My father-in-law is a former woodshop teacher and a great guy. My dad is a garage-time woodworker who isn't afraid to chisel away at a fun problem. These two were my first sources and they didn't disappoint. I had my design, got the lumber, and laminated it to start the process:
Also, this comes later in the process but is well worth its space under lesson one, but after a trip to Rockler Woodworking & Hardware, I had enough pep in my step to give this a shot. I had made some mistakes and once again needed to feel validated. The look on the guy's face when I came in and asked if anyone knew about band saw jewelry boxes was priceless. In his spare time, this is what he did! He was pleasantly overwhelmed with the task I had chosen to conquer and was more than willing to help.
Sure, I could've watched my fair share of YouTube videos about how to finish this masterpiece, but nothing compares to him dancing with the curves of my design, offering up suggestions and giving fair warnings about what he has made mistakes on in the past. Nothing could've compared to the education he gave me. Nothing.
Sure, I could've watched my fair share of YouTube videos about how to finish this masterpiece, but nothing compares to him dancing with the curves of my design, offering up suggestions and giving fair warnings about what he has made mistakes on in the past. Nothing could've compared to the education he gave me. Nothing.
Lesson 2: It's OK To Suck
I've laminated the wood together; all 5 pieces, in fact. I've called up my father-in-law, the owner of a Delta band saw, and I'm on my way to get this project started for real. I show up with a hunk of wood and he looks at me like I'm nuts.
"What type of wood is this?"
"Hickory"
"WHOAAAAA (translation: you're insane). OK, well, let's set you up and get you started (translation: goooooood luck. I'll grab us a beer)"
I'm no rookie when it comes to garage work, so this is the fun part. We set up the band saw blade and I tested out a sample cut to make sure that the teeth pulled (moved through the wood) like I wanted them to and didn't travel (wiggle or veer off) too much. Due to the nature of the cuts and the hardness of the wood, what was supposed to take 30 minutes took an hour and a half. Why? Because the blade flew off the wheel 4 times. Yeah, scary stuff. But doable:
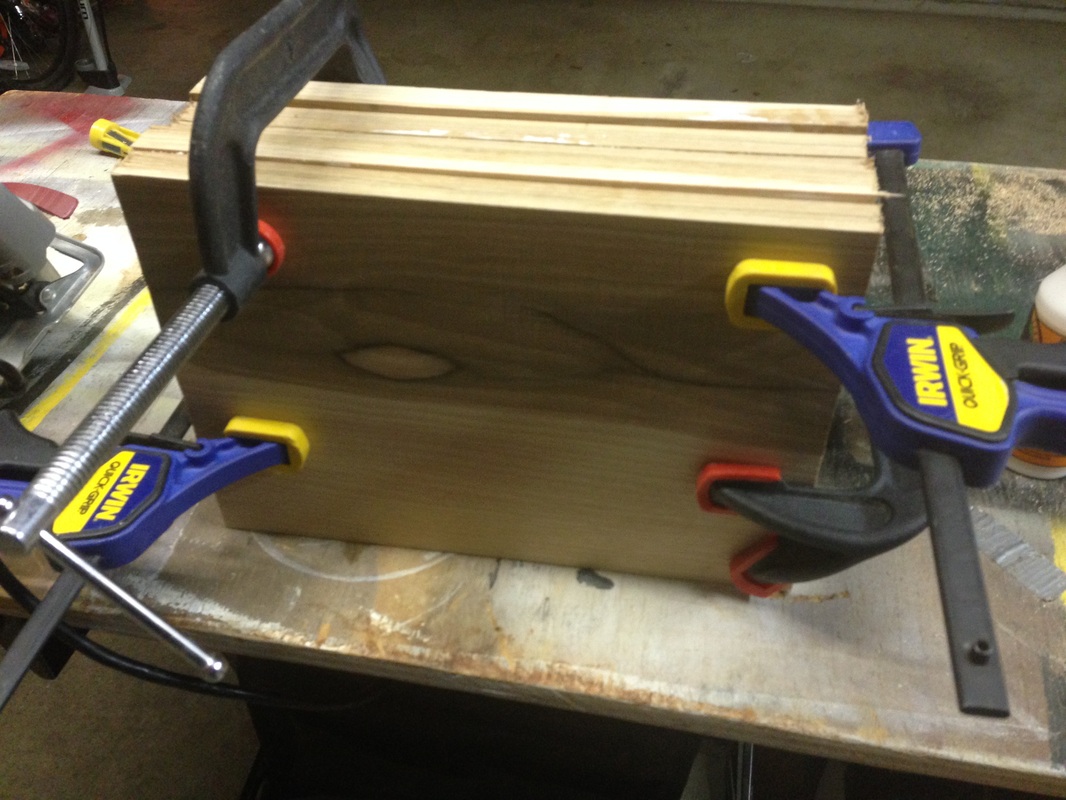
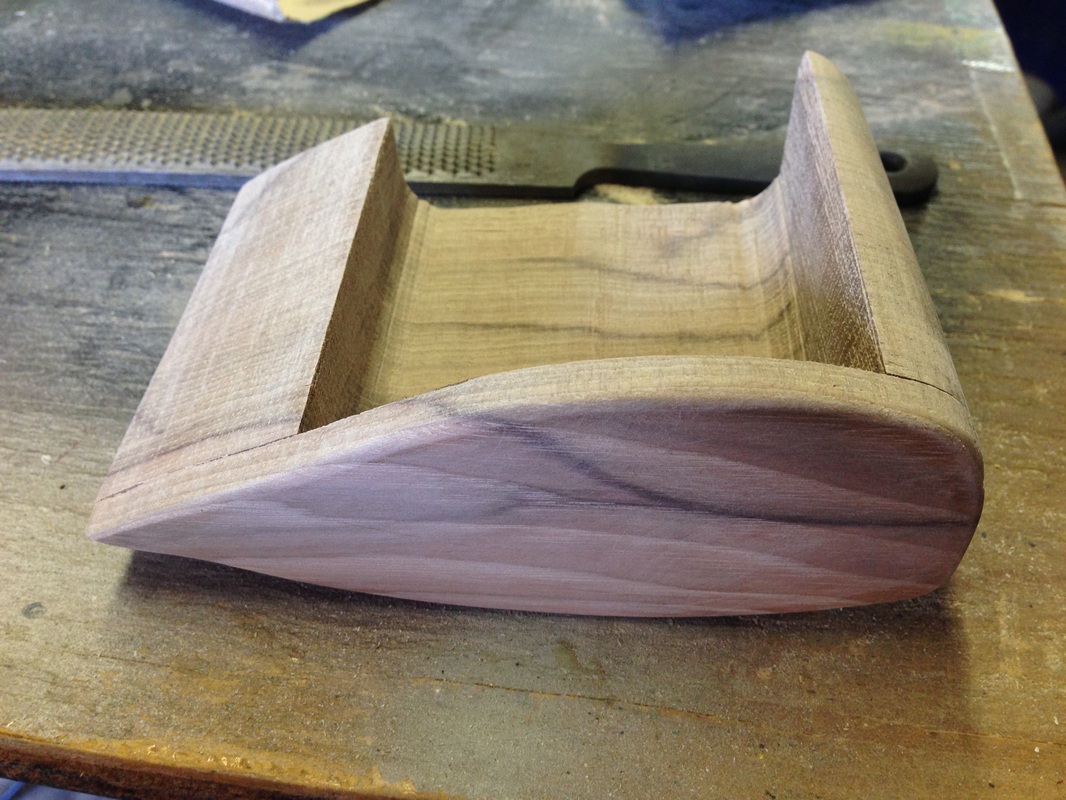
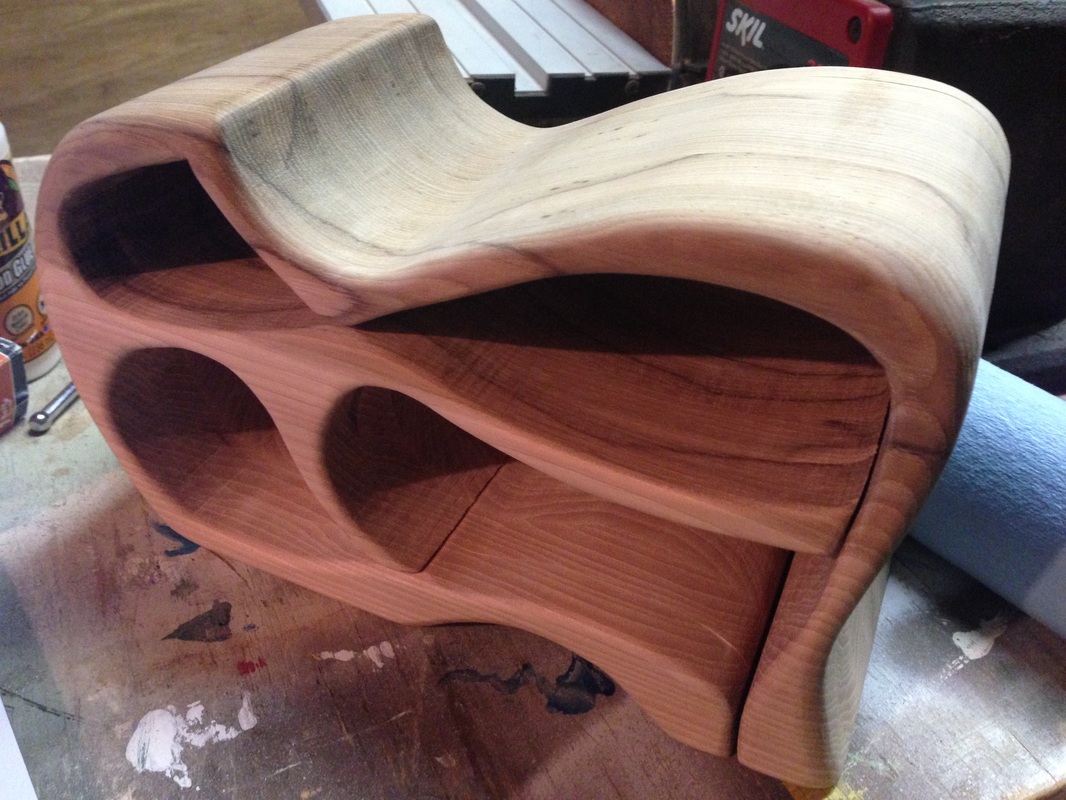
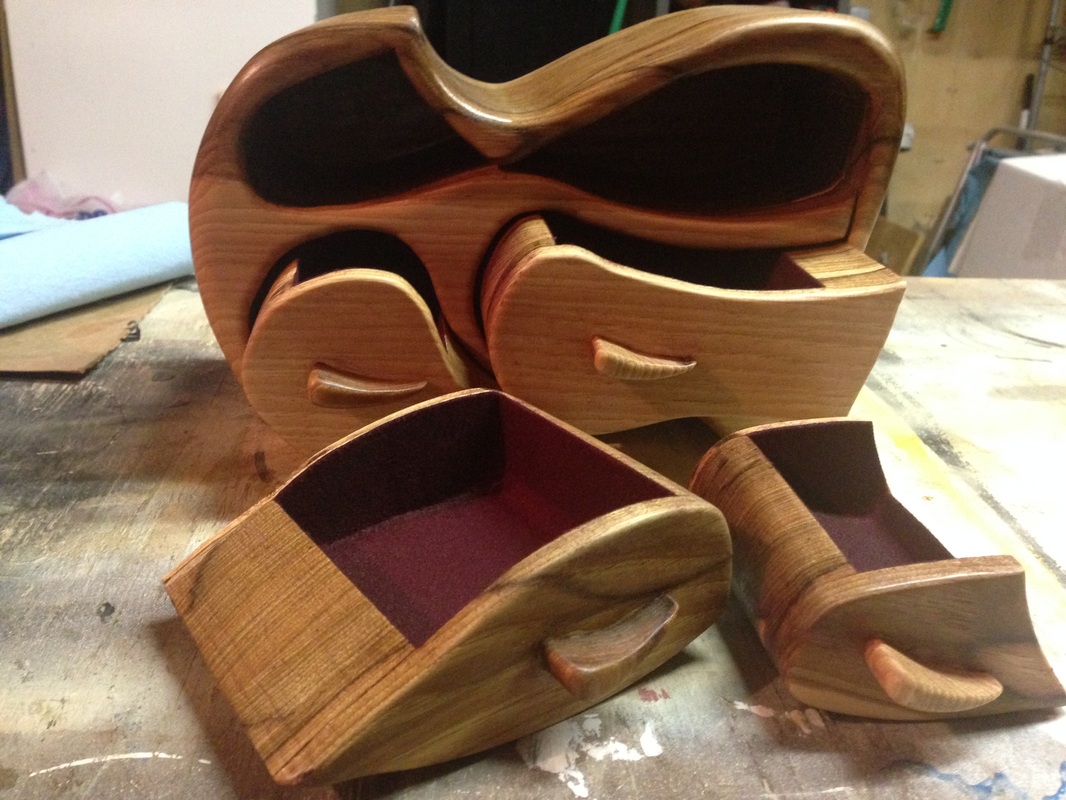
If you don't have an eye for woodworking, I'll do you a favor and point out some of the worst flaws. All around the cuts, there are ridges that need to be sanded. In the top left hole near the point, there is a cut that went a little bit too far (which is A LOT too far). In the top right hole near the top right of the cut, the blade travelled too far. In the bottom left hole near the bottom left, I didn't round my cut well enough. At the top of the top, there is a pronounced bump because I let the piece take me too far.
To boil this down, I would be embarassed to finish this and hand it to anyone as a work that they should enjoy. At best, this is firewood. At worst, this is a waste of $37 in lumber, 3 hours of a day, and an idea that was supposed to make my wife happy.
However, this was the beauty - I knew it was just the beginning of a much larger project. In school, we don't celebrate the process; all we want is the product. In woodworking, the process is seen throughout every fine finished piece. It is appreciated and valued among those who know what it took to get there. This was my mess and I was so proud of what I hoped it would become.
Lesson 3: Don't Panic
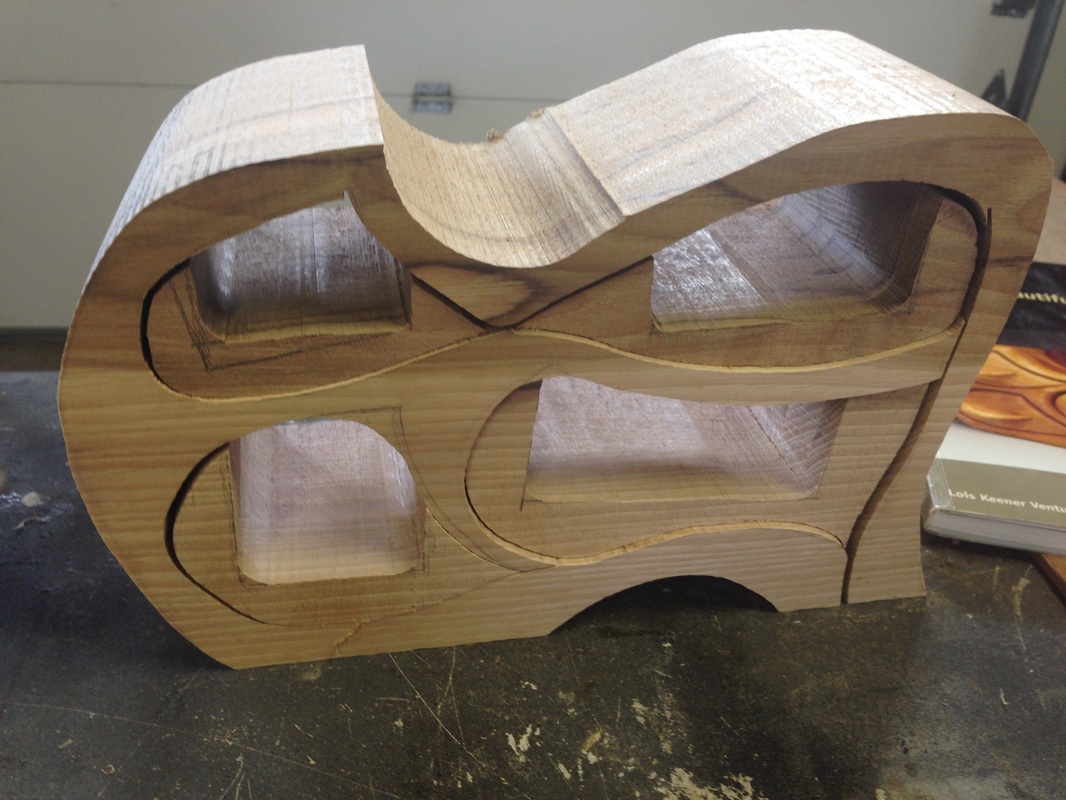
Now the drawers are cut out. I took the front face of each drawer off with the band saw so that I could save them for later and glue them on. I then quickly gouged out the guts of each drawer to create 4 places for my wife to place any and all of the jewelry that she thought would be worthy of its security. Great stuff, right?
DAMNIT.
Let me repeat: I took the front face of each drawer off with the band saw so that I could save them for later and glue them on. I then quickly gouged out the guts of each drawer to create 4 places for my wife to place any and all of the jewelry that she thought would be worthy of its security. Great stuff, right?
Wrong.
Notice what I forgot? Neither did I until I got home and it was too late. None of the 4 drawers had the backs cut out before gouging out the space for the jewelry to rest. This meant that I was screwed. The project was over. It's either down to leaving each drawer without a back (which is pointless when it's filled with small jewelry) or slapping on a veneer that will negate a majority of the beauty of any finished product.
Following a brief panic attack, I went back to Rockler. Seriously, the guys and gals over there are professionals. One of the guys calmed me down and had an idea. On his call, he would cut out veneer backs for each of the drawers out of some remaining hickory that were about 1/8" thick and I would just glue those on. Each drawer would stick out about 1/8" of an inch, but that adds dynamic and beauty. Sure, let's do it.
WHABAM.
Two cuts in, his expensive band saw stopped running due to a bent blade. Not only is this box causing me problems, but now it's costing me time and Rockler money. To finish the veneers, I went home and got creative:
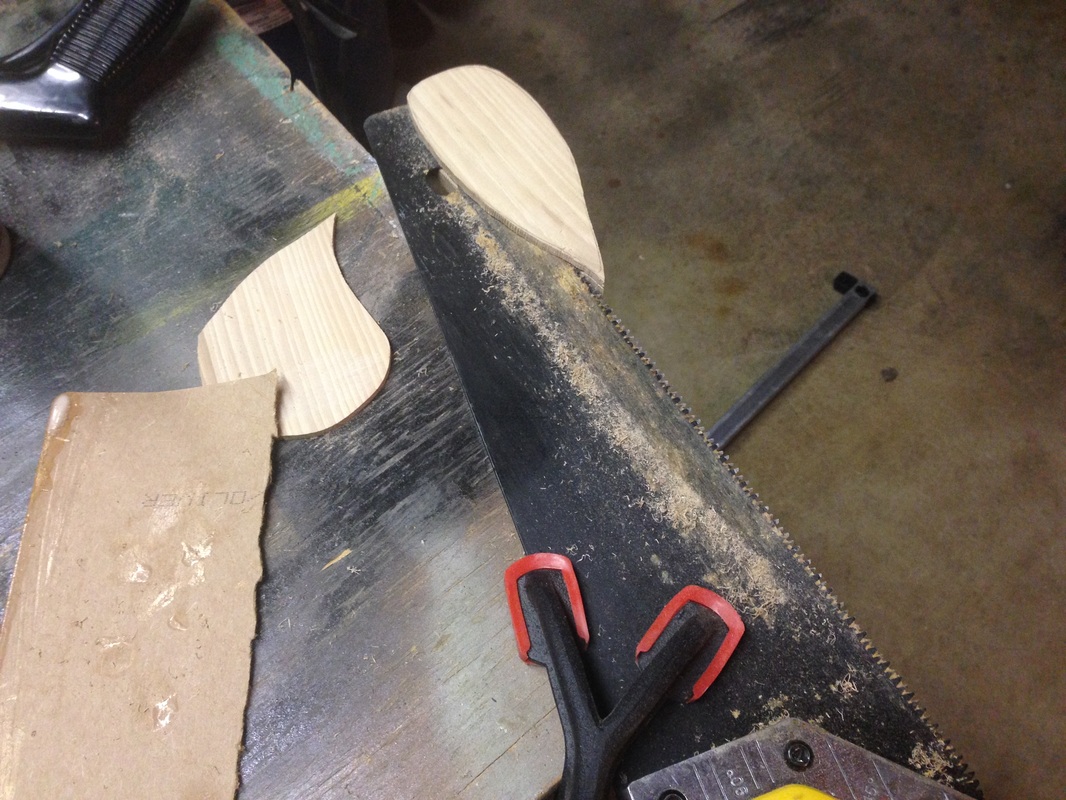
No, kids, don't try this at home. Or anywhere. But this was desparation time. The guys at Rockler and both of my fathers had questioned if I could finish this before her birthday. Yes, yes I could. And I would.
This is a hand saw C-clamped to a work bench. Ridiculous, I know. With my bare hand pushing and pulling the final two pieces, I cut two veneers in a way that I don't think has been done since the 1300's. Once again, ridiculous, I know.
Aside from a couple minor panic attacks, there was this strange feeling that I would find a way to make it work. I've never done anything remotely challenging and don't know if I'll finish in time, but the people with whom I've entrusted my learning with have given me enough confidence that I could in fact master something I didn't even think I could start. Familiar?
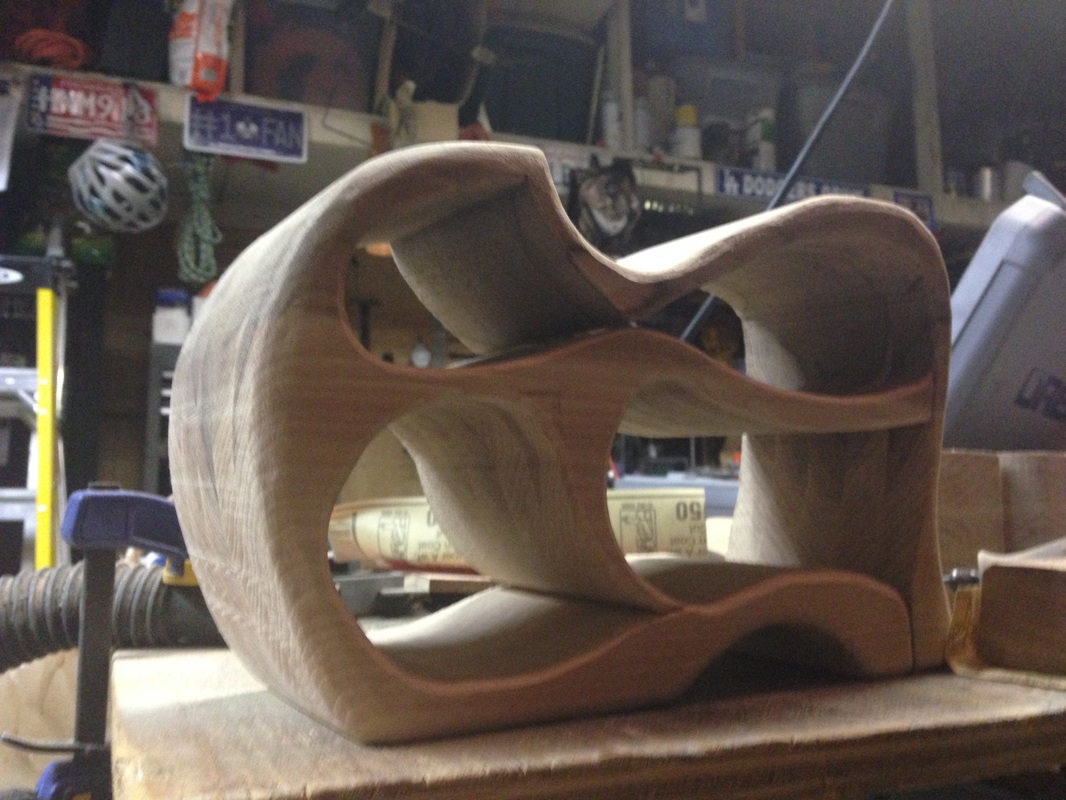
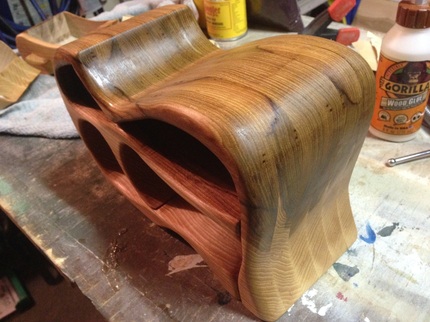
Lesson 4: It's The Small Things
I'll do you a favor - when they say to not use hickory, don't use hickory. Why? It's hard. REALLY HARD. How does that make a difference? When you're sanding a softer wood like ash or pine, they are more porous, meaning that sandpaper can dig into the wood easier and sand out those mistakes, grooves, or imperfections a lot faster. That being said, I don't regret the choice of hickory. The color, the character, and the finish that it provided was well worth it.
Taking that all in, it was a beast to sand. 17 hours in total. Why? Every single detail showed from the hickory's strength. 60 Grit paper didn't remove it. A belt sander didn't remove it. A drum sander didn't remove it. It took hours to remove the smallest scratches and imperfections. It took hours to smooth out the rounding and help it flow better from one drawer to the next, from one turn to the next.
Here's how it started:
And then here:
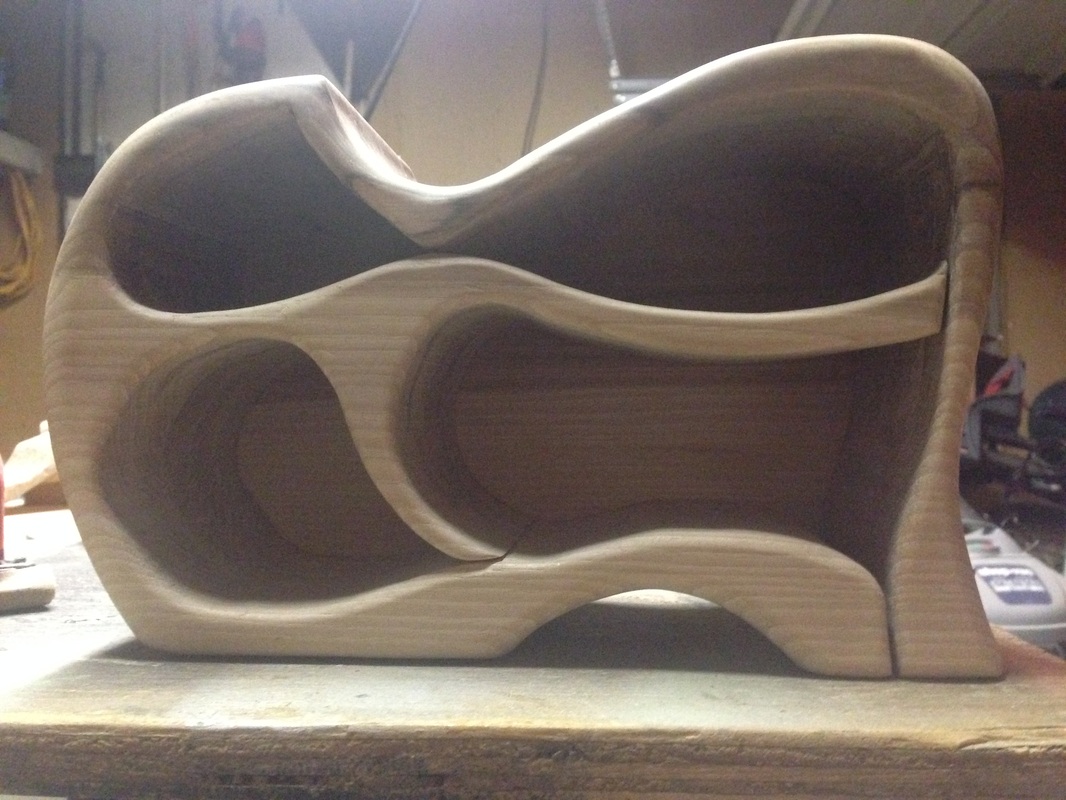
Then here:

And finally to here:
Lesson 5: It's How You Finish
I could've painted on a cherry stain to this. It could've received the good old MinWax that I slather onto every woodworking job that I do. But this? This piece was special, so it needed to be special. For this, I wiped on, and off, poly-oil finish. No stain, no lacquer, just finish. For three days, I went out to the garage and just wiped the jewelry box with 3 separate layers of finish. Never in my life had I cared so much about the final layers of an object.
Here's the first coat:
Here's the first coat:
After the second coat:
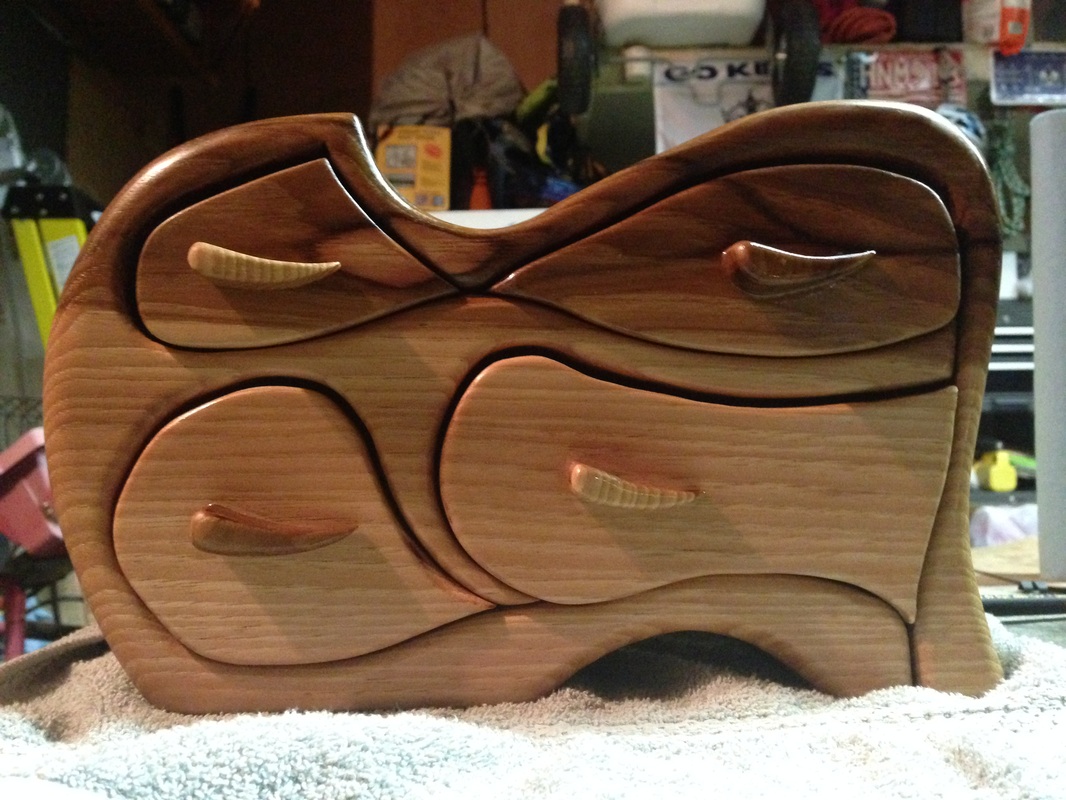
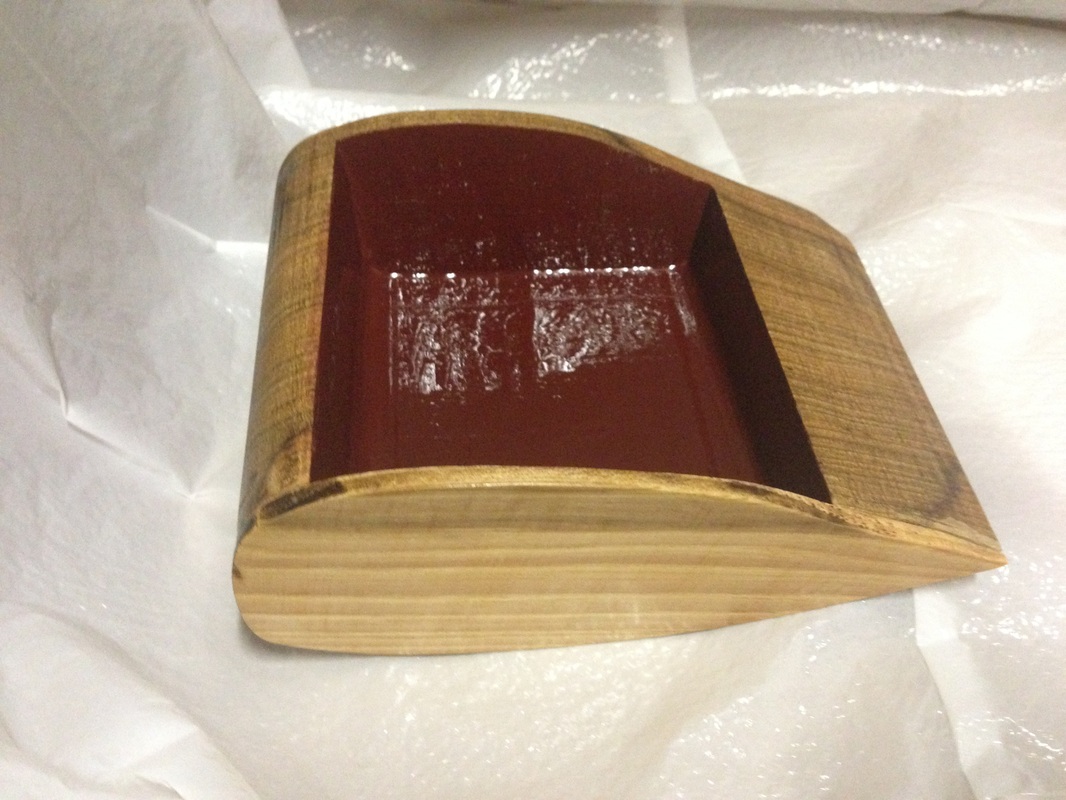
Going back to the attention to details and the mentors at Rockler, the drawers were an afterthought for me, but not for them.
"I'm just looking for felt to glue into the drawers to give them the feel of a jewelry box"
"No you're not. You're going to do it right. Let me show you. Here's what you're gonna do. You're gonna paint on the glue, nice an thick, then you're gonna shoot the cannon. Once you've done that, you're gonna rotate the piece 90 degrees and do it again, then repeat until you've gone 360. In the morning, you're gonna shake off all the loose fabric back into the back to use for your next one"
***my next one? WOW***
Sure! This whole project has been a learning experience, so why not?!
Man, I'm happy he told me that. I painted on the wine-stained glue, flocked each of the drawers, and let mother nature finish the job:
Lesson 6: Take A Risk

In our La Cucina Matematica trainings, our whole day is centered around taking a risk. We encourage teachers to step outside their comfort zones and do something that they didn't think was possible. As a technology coach and math enthusiast, I encourage teachers and students to take a risk and trust me that it will work out alright. Yet at the same time, I don't take risks myself. I'm comfortable. My risks are calculated ones. I'll accept challenges from time to time, but there is a level of certainty that the outcome is what I would expect. This? No way.
In three weeks, I went from 14 board-feet of wood to something that I would be honored to see passed down to future generations. Showing the final product to my friends at Rockler and fathers who were there for me the whole way wasn't the validation that I was looking for, but it was certainly reassuring to see their reactions. This will not be the last one I make, but it might be with a softer piece of lumber!
There's only one validation I was looking for this time around:
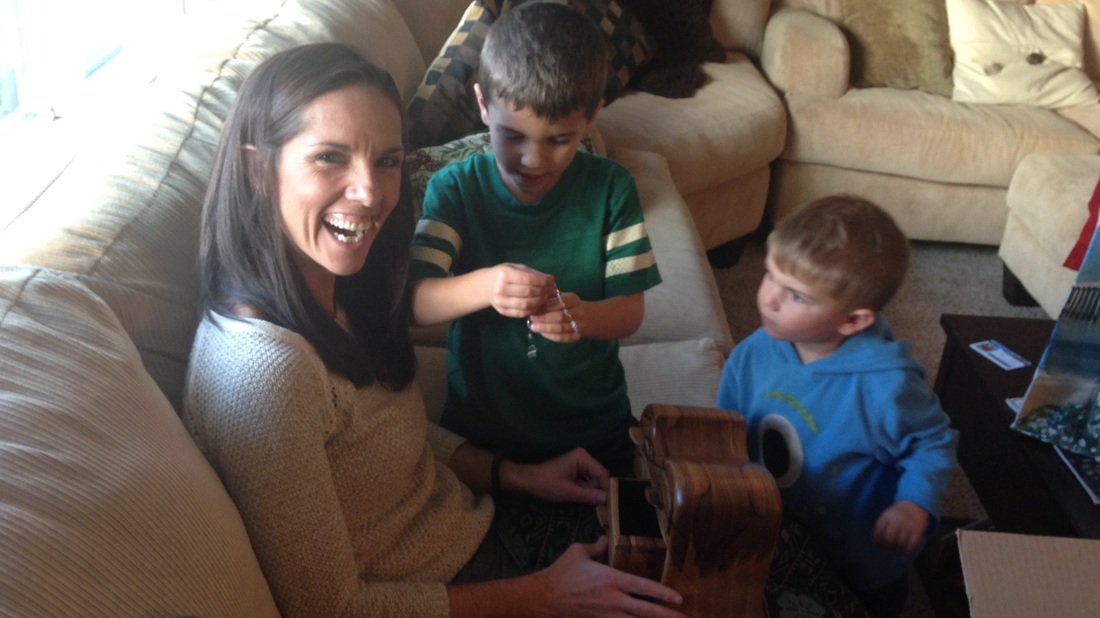
I've learned far more than I ever thought I would from a sheet of hickory and a band saw jewelry box. Thank you, Erin, for being the wonderful person you are that makes it easier to get through this life. I love you and hope you enjoy this gift as much as I enjoyed making (and learning from) it.
Happy "Take A Risk" Fishing
 RSS Feed